This is a short article to document a process of adding a fairly simple feature to Gadgetbridge. This article is intended to newcomers wanting to participate in Gadgetbridge development who do have some understanding of programming in Java for Android (in Android Studio). Written by a fellow novice programmer in the Android Java ecosystem, it hopes to serve as a basic introduction to some of the concepts used in the Gadgetbridge codebase. There is more information in our wiki, like the Developer documentation and if you are looking for an advice how to add a new device support into Gadgetbridge, there is a comprehensive New device tutorial.
Introduction
Gadgetbridge has been showing the wearable device's battery level and low battery warning almost forever since it's beginning. What we want to add is a screen showing us a graph of battery level over time + maybe even some more known details about the battery itself if the device provides it.
First, we need to do some digging and find out how Gadgetbridge knows about device battery stats. This is the first biggest hold-up, because getting familiar with the codebase does take some time but is an essential part of the process. Do spend some time digging through the code to understand the patterns, packages and code layout.
Hooking into device events
Where do we begin... searching in files Ctrl-Shift-F for battery sounds
like a good place to start for us, but it is a bit too vague, so we try
searching for battery low, since we know this can come up in the
notification. We get some strings in the strings.xml, so let's find a usage of
one of them, notif_battery_low_title via same global search in files. One of
the places where this is used is handleGBDeviceEvent(GBDeviceEventBatteryInfo
deviceEvent) in AbstractDeviceSupport. This seems to be a good hit, because
if we look at usage of this method via Ctrl-B, we can see it being used in
most if not all of the implemented devices. This final method is a good place
where we can catch the event of getting battery info as it is received from the
device. Here, we can hook our routine to store this data into database. We can
also note and explore a bit the GBDeviceEventBatteryInfo class used in the
handleGBDeviceEvent(GBDeviceEventBatteryInfo deviceEvent), as it provides
more details about the battery, if a particular device supports that, for
example number of charges, last charge time and so on.
Database
To store the data, we need a database table. In Gadgetbridge, database access
is provided via greenDAO - Object
Relational Mapper for Android. Tables are defined in
src/nodomain/freeyourgadget/gadgetbridge/daogen/GBDaoGenerator.java as
entities. In the GBDaoGenerator we define our entity, containing properties,
which are mapped to database columns. To store different data per device, we
must ensure to add mapping to our devices with the addToOne(device,
deviceId). The above defined entities will be auto-generated in the
nodomain.freeyourgadget.gadgetbridge.entities package. Experiment as needed
but make sure to test your object model well and check logcat for error
messages, because the DAO can insert values to the database but still throw
errors if for example indexes are not set correctly.
After the table definition is done, we must also bump the database schema
version: Schema schema = new Schema(VERSION, MAIN_PACKAGE + ".entities");,
this is important for database migrations.
Activity
At this point, we are getting our battery data, are storing it into database
and would like to show a line chart showing battery level over time. To define
a new activity (screen), it is important to extend the AbstractGBActivity
because it will taking care of the theme (light and dark) language switching
and so on.
Charts
Gadgetbridge has several places where charts are already used, for that the
MPAndroidChart library is being
utilized. Some convenience classes are already defined and should be reused,
like the AbstractChartFragment, which is especially useful if you want to
show activity data like steps or heart rate.
Logging
When displaying log messages, never use the e.printStacktrace(). Either use
the predefined
logger
private static final Logger LOG = LoggerFactory.getLogger(Your.class);, or
you can also use the toast GB.toast(getContext(), "Error doing xyz: " +
e.getMessage(), Toast.LENGTH_LONG, GB.ERROR, e);, this will show the toast,
log the stacktrace in logcat and write the logs (if enabled).
General advice
- Make sure to auto-format the code you write, but leave existing code as is, even if not formatted well, because formatting it would break existing PRs and it also destroys information about the original author.
- There are many convenience and utility classes already defined in
Gadgetbridge which should be re-used instead of defining again (for example
from the
nodomain.freeyourgadget.gadgetbridge.utilpackage). - Abstract classes definitions are very commonly used throughout and should also be used where useful.
- Pay attention to the warnings and suggestion Android Studio provides, in general code and also in activity layouts.
- Try and test your work diligently - there is no bug tracking code in Gadgetbridge and if the app has issues or randomly crashes on some user devices, there is no way to learn about it, unless people make the effort and report it. If you have multiple Android phones, ideally test on them, to see how different Android version behave, what different screen sizes and pixel densities look like.
- Also, do not forget to test in both light and dark theme.
Conclusion
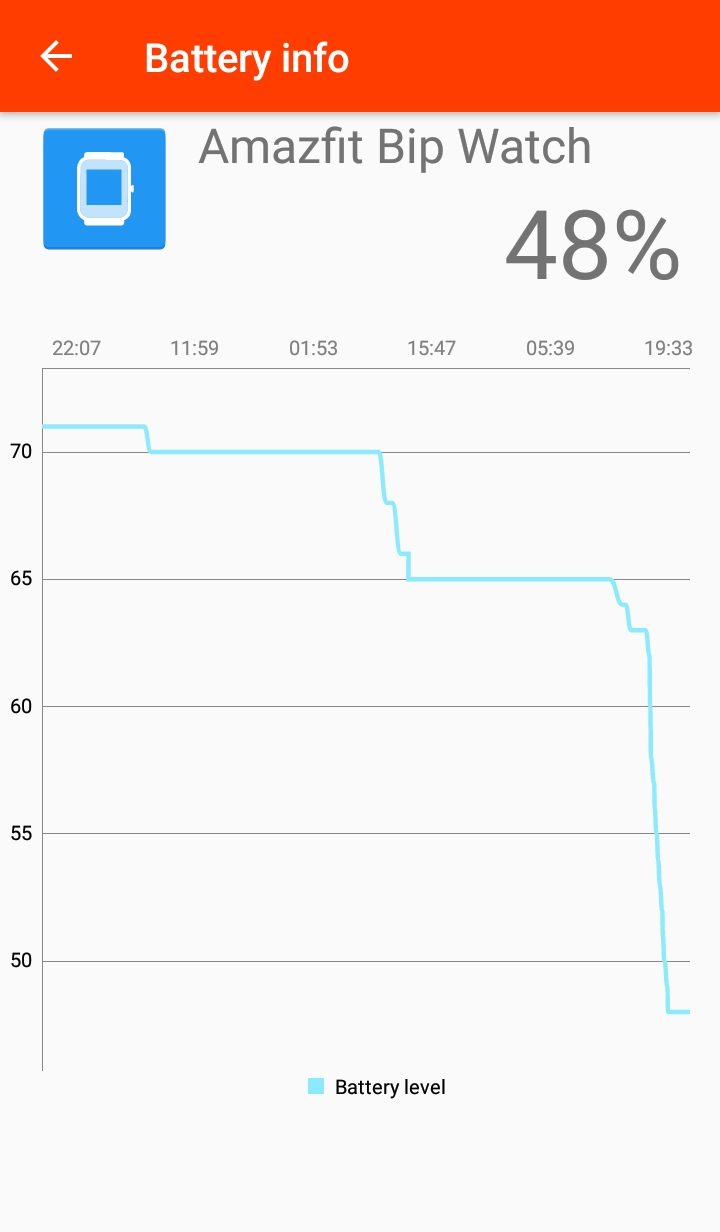
So this is it, a quick introduction to a very small portion of Gadgetbridge internals. And where is our Battery info screen? Well, the initial code is here and a picture is below, but it needs much more work, like better axis formatting, moving between days... because like always, the small fine details take 80% of the real work. I will keep working on it and it will be released when ready :)